designed by Peter JAKAB
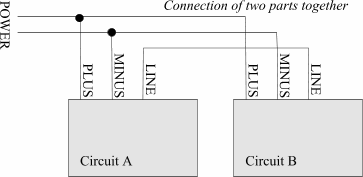
This circuit is a two-way (full-duplex) construction planned for use as doorphone. To use, two pieces of the same circuit must be connected together with three wires: MINUS (ground), PLUS (power) and LINE. One of the circuits must be connected to a stabilized power supply, 6-30VDC.
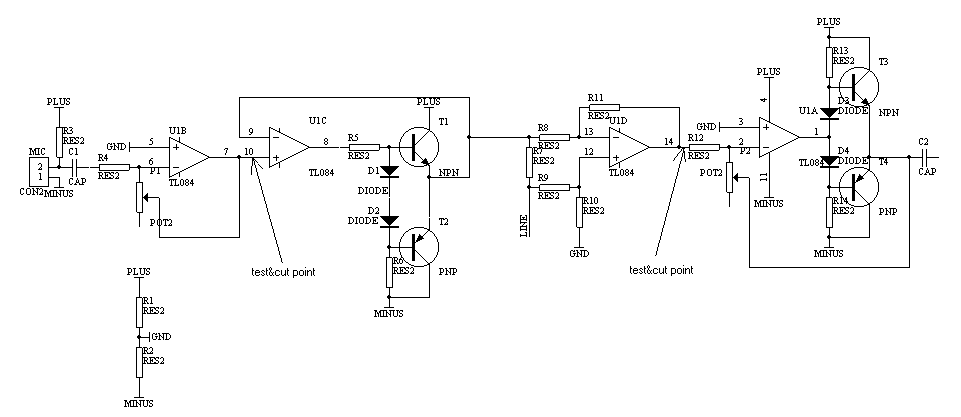
U1B is a microphone amplifier, it is connected to a 2-terminal condenser microphone. Its' output is directly used by U1C, which drives the line leading to the pair of the circuit. The outgoing microphone signal is totally isolated from the incoming signal (going to the speaker amplifier) by U1C&U1D which realize two-way signal transmission on the same line. The design of the circuit makes possible to design the outdoor part of the circuit pair simple: you can place the microphone and the speaker close together (like in speakerphones), they won't interfere or make up a feedback loop as long as you isolate the mic and the speaker at the other side (indoor circuit) with eg. a phone receiver. The U1A is the active part of the power amplifier used to drive the speaker.
You can separately check the circuit step by step:
Connect the output of U1B to a known working amplifier and you should be able to test this part. Try tuning on P1 to adjust the amplifier gain for the test. If the micamp part works, cut the wire between the output of the U1D part and R12. Adjust P2 to stand in the middle. By touching the flying end of R12 you should hear 50Hz noise on the speaker. Then directly connect U1B output to R12, the input of the speaker amplifier. Care of the separation of the mic and the speaker to avoid positive acoustic feedback. You can try to temporarily replace the speaker with a headphone.
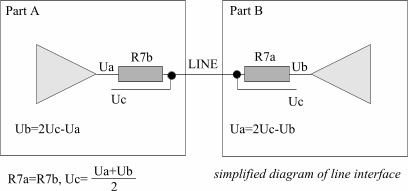
Disconnect U1C-s positive input and R12 from U1D. The remaining circuit in the middle is the line interface, which handles the separation of input/output signal. To check this part, you should connect two pieces of this remaining interface together (with the same power supply and the LINE wires connected). The circuit operates such a way that an input voltage at side A will appear on the output of side B, and vice versa, almost independent of each other. The input voltage should not be too close to the MINUS or the PLUS rail (about 2V), because OPA-s do not like it. To generate the test voltages, connect two potmeters between MINUS & PLUS, and the slider to the inputs of the circuits (non-inverting input of U1C).
|
|
|